Sunday 8 September 2019

Basic of Google chatbot dialogflow

What are chatbots?
A chatbot is a computer program that simulates human conversation through voice commands or text chats or both.
In today’s world, messaging has become on of the popular methods of communication, whether it’s through text messages or messenger apps, it’s how a lot of people prefer talking with one another, because of this businesses are developing chatbots that can interact like humans.
What is DialogFlow?
Dialogflow is a Google-owned developer of human-computer interaction technologies based on natural language conversations.
Starting with Dialogflow
Here are the steps to start with Dialogflow
  1. Create a Gmail account.
  2. Go to the console- https://dialogflow.com/
  3. Click create an agent in the left menu.
Now let’s create a simple CodeArt_IT using Dialogflow.

1. Creating an agent “CodeArt_IT”: After creating an agent, you can add the description or change the default time zone and then save it.


2. Creating Intents: Intents in an agent maps user input to responses. In each intent, you define examples of user utterances that can trigger the intent, what to extract from the utterance, and how to respond.

  • Intent name: The name of the intent. The intent name is passed to your fulfillment and identifies the matched intent.
  • Training phrases: Examples of what users can say to match a particular intent. Dialogflow automatically expands these phrases to match similar user utterances.
  • Action and parameters: Defines how relevant information (parameters) are extracted from user utterances. Examples of this kind of information include dates, times, names, places, and more. You can use parameters as input into other logic, such as looking up information, carrying out a task, or returning a response.
  • Response: An utterance that’s spoken or displayed back to the user.
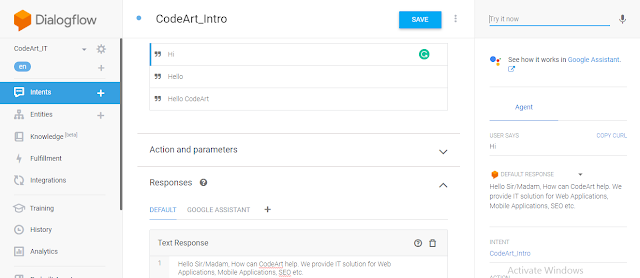
We create our first intent is "CodeArt_Intro".


For instance, the user could ask the following utterances:


3. Creating Entities: 
When setting up your agent, it’s best to define your entities prior to adding the training phrases to your intents. This will ensure the correct words are annotated when the training phrases are supplied. You can create entities afterward, but you’ll need to manually annotate the training phrases in each intent.
Let’s create another intent is "CodeArt_Tech":


1. Topping
2. Type of crust


Now, we add types of toppings in our entities and their synonyms-


4. Action and Parameters- Within each intent, there is a table under the training phrases section entitled Action and parameters. Once you annotate your training phrases, the corresponding parameters automatically appear in this table. This section also contains a text field named “action”. The value of this field is passed to fulfillment and can be used to trigger specific logic.


Saturday 31 August 2019

SignalR Chat Application using Asp.Net Core

Today's modern apps are expected to deliver up-to-date information without hitting a refresh button. Add real-time functionality to your dashboards, maps, games and more.

What is real-time functionality? It's the ability to have your server-side code push content to connected clients as it happens, in real-time.
While chat is often used as an example, you can do a whole lot more. Any time a user refreshes a web page to see new data, or the page implements Ajax long polling to retrieve new data, it's a candidate for using SignalR.
SignalR also enables completely new types of applications that require high-frequency updates from the server, e.g. real-time gaming.

What is a SignalR hub

The SignalR Hubs API enables you to call methods on connected clients from the server. In the server code, you define methods that are called by the client. In the client code, you define methods that are called from the server. SignalR takes care of everything behind the scenes that makes real-time client-to-server and server-to-client communications possible.

Prerequisites
  • Visual Studio 2017 version 15.9 or later with the ASP.NET and web development workload. You can use Visual Studio 2019, but some project creation steps differ from what's shown in the tutorial.
  • .NET Core SDK 2.2 or later
Create a web project
  • From the menu, select File > New Project.
  • In the New Project dialog, select Installed > Visual C# > Web > ASP.NET Core Web Application. Name the project SignalRChat.
  • Select Web Application to create a project that uses Razor Pages.
  • Select a target framework of .NET Core, select ASP.NET Core 2.2, and click OK.

Add the SignalR client library
The SignalR server library is included in the Microsoft.AspNetCore.App metapackage. The JavaScript client library isn't automatically included in the project. For this tutorial, you use Library Manager (LibMan) to get the client library from unpkg. unpkg is a content delivery network (CDN)) that can deliver anything found in npm, the Node.js package manager.

  • In Solution Explorer, right-click the project, and select Add > Client-Side Library.
  • In the Add Client-Side Library dialog, for Provider select unpkg.
  • For the Library, enter @aspnet/signalr@1, and select the latest version that isn't reviewed.
                                         Libman creates a wwwroot/lib/signalr folder and copies the selected files to it.


Create a SignalR hub A hub is a class that serves as a high-level pipeline that handles client-server communication.

  • In the SignalRChat project folder, create a Hubs folder.
  • In the Hubs folder, create a ChatHub.cs file with the following code:

          using Microsoft.AspNetCore.SignalR;

          using System.Threading.Tasks;


           namespace SignalRChat.Hubs
              {
                   public class ChatHub : Hub
                      {
                          public async Task SendMessage(string user, string message)
                             {
                                 await Clients.All.SendAsync("ReceiveMessage", user, message);
                              }
                         }
                 }
Configure SignalR

The SignalR server must be configured to pass SignalR requests to SignalR.

  • Add the following highlighted code to the Startup.cs file.
    using Microsoft.AspNetCore.Builder;
using Microsoft.AspNetCore.Hosting;
using Microsoft.AspNetCore.Http;
using Microsoft.AspNetCore.Mvc;
using Microsoft.Extensions.Configuration;
using Microsoft.Extensions.DependencyInjection;
using SignalRChat.Hubs;

namespace SignalRChat
{
public class Startup
{
public Startup(IConfiguration configuration)
{
Configuration = configuration;
}

public IConfiguration Configuration { get; }

// This method gets called by the runtime. Use this method to add services to the container.
public void ConfigureServices(IServiceCollection services)
{
services.Configure<CookiePolicyOptions>(options =>
{
// This lambda determines whether user consent for non-essential cookies is needed for a given request.
options.CheckConsentNeeded = context => true;
options.MinimumSameSitePolicy = SameSiteMode.None;
});


services.AddMvc().SetCompatibilityVersion(CompatibilityVersion.Version_2_1);

services.AddSignalR();
}

// This method gets called by the runtime. Use this method to configure the HTTP request pipeline.
public void Configure(IApplicationBuilder app, IHostingEnvironment env)
{
if (env.IsDevelopment())
{
app.UseDeveloperExceptionPage();
}
else
{
app.UseExceptionHandler("/Error");
app.UseHsts();
}

app.UseHttpsRedirection();
app.UseStaticFiles();
app.UseCookiePolicy();
app.UseSignalR(routes =>
{
routes.MapHub<ChatHub>("/chatHub");
});
app.UseMvc();
}
}
}
These changes add SignalR to the ASP.NET Core dependency injection system and the middleware pipeline.

Add SignalR client code

  • Replace the content in Pages\Index.cshtml with the following code:
         @page
<div class="container">
<div class="row">&nbsp;</div>
<div class="row">
<div class="col-6">&nbsp;</div>
<div class="col-6">
User..........<input type="text" id="userInput" />
<br />
Message...<input type="text" id="messageInput" />
<input type="button" id="sendButton" value="Send Message" />
</div>
</div>
<div class="row">
<div class="col-12">
<hr />
</div>
</div>
<div class="row">
<div class="col-6">&nbsp;</div>
<div class="col-6">
<ul id="messagesList"></ul>
</div>
</div>
</div>
<script src="~/lib/signalr/dist/browser/signalr.js"></script>
<script src="~/js/chat.js"></script>

The preceding code:
Creates text boxes for name and message text, and a submit button.
Creates a list with id="messagesList" for displaying messages that are received from the SignalR hub.
Includes script references to SignalR and the chat.js application code that you create in the next step.
  • In the wwwroot/js folder, create a chat.js file with the following code:
"use strict";

var connection = new signalR.HubConnectionBuilder().withUrl("/chatHub").build();

//Disable send button until connection is established
document.getElementById("sendButton").disabled = true;

connection.on("ReceiveMessage", function (user, message) {
var msg = message.replace(/&/g, "&amp;").replace(/</g, "&lt;").replace(/>/g, "&gt;");
var encodedMsg = user + " says " + msg;
var li = document.createElement("li");
li.textContent = encodedMsg;
document.getElementById("messagesList").appendChild(li);
});

connection.start().then(function(){
document.getElementById("sendButton").disabled = false;
}).catch(function (err) {
return console.error(err.toString());
});

document.getElementById("sendButton").addEventListener("click", function (event) {
var user = document.getElementById("userInput").value;
var message = document.getElementById("messageInput").value;
connection.invoke("SendMessage", user, message).catch(function (err) {
return console.error(err.toString());
});
event.preventDefault();
});

The preceding code:
Creates and starts a connection.
Adds to the submit button a handler that sends messages to the hub.
Adds to the connection object a handler that receives messages from the hub and adds them to the list.

Run the app
  • Press CTRL+F5 to run the app without debugging.
  • Copy the URL from the address bar, open another browser instance or tab, and paste the URL in the address bar.
  • Choose either browser, enter a name and message, and select the Send Message button.
  • The name and message are displayed on both pages instantly.

Sunday 25 August 2019

SQL Server Generate Dynamic columns using Pivot

Introduction

SQL Server PIVOT operator rotates a table-valued expression. It turns the unique values in one column into multiple columns in the output and performs aggregations on any remaining column values.
You follow these steps to make a query a pivot table:
  • First, select a base dataset for pivoting. 
  • Second, create a temporary result by using a derived table or common table expression (CTE) 
  • Third, apply the PIVOT operator.
If you are using SQL Server 2005+, then you can use the PIVOT function to transform the data from rows into columns.
It sounds like you will need to use dynamic SQL if the weeks are unknown but it is easier to see the correct code using a hard-coded version initially.

For Example :

First up, here are some quick table definitions and data for use:

CREATE TABLE #Product
(
  [S] int,
  [W] int,
  [C] int
);

INSERT INTO #Product
(
  [S],
  [W], [C]
)
VALUES
    (102, 1, 96),
    (101, 1, 138),
    (105, 1, 37),
    (109, 1, 59),
    (101, 2, 282),
    (102, 2, 212),
    (105, 2, 78),
    (109, 2, 97),
    (105, 3, 60),
    (102, 3, 123),
    (101, 3, 220),
    (109, 3, 87);

If your values are known, then you will hard-code the query:

DECLARE @cols AS NVARCHAR(MAX),
    @query  AS NVARCHAR(MAX)

select @cols = STUFF((SELECT ',' + QUOTENAME(Week)
                    from #Product
                    group by Week
                    order by Week
            FOR XML PATH(''), TYPE
            ).value('.', 'NVARCHAR(MAX)')
        ,1,1,'')

set @query = 'SELECT S,' + @cols + ' from
             (
                select S, W, C
                from #Product
            ) x
            pivot
            (
                sum(xCount)
                for week in (' + @cols + ')
            ) p '
execute(@query);

The dynamic version generates the list of week numbers that should be converted to columns. Both give the same result:

|    S    |   1    |   2  |   3   |
---------------------------
|   101 | 138 | 282 | 220 |
|   102 |  96  | 212 | 123 |
|   105 |  37  |  78  |  60  |

|   109 |  59  |  97  |  87  |


SQL Server Comma Separate Value and String

Method 1: Split Comma Separated List Without Using a Function
They were storing comma-separated values in a column of the table. This table was getting populated from some source via SSIS package. Here is the simplified version of the problem I was presented.


Method 2: Split Comma Separated List With Using a Function Now we can use STRING_SPLIT function and can achieve that very quickly. Let us understand with a simple example.